(101)

[SpringBoot] CoolSMS 이용한 휴대폰 인증

서론 휴대폰과 이메일 중 압도적으로 휴대폰 사용량이 높다고 생각했고 이메일은 가입 시 인증받지 않는 곳도 많기 때문에 우선적으로 휴대폰인증을 구현하려고 했다. 이메일은 필요 시 SMTP 활용하여 구현 예정 기능 구현을 위해 찾아본 아래의 API 중 coolsms를 선택했다. 1. 네이버 SMS 2. Twilio 3. coolSMS 네이버는 한달에 50건이 무료고, Twilio는 가입 시 15달러를 준다고 한다. cool sms 사용하기 들어가기 앞서 유료임.. SMS를 보내는 것이기 때문에 당연한가 ? 세상에서 가장 안정적이고 빠른 메시지 발송 플랫폼 - 쿨에스엠에스 손쉬운 결제 전용계좌, 신용카드, 계좌이체 등 국내 결제 뿐만 아니라 해용신용카드로 한번의 카드번호 등록으로 자동충전까지 지원합니다. 전용..

[SpringBoot] AWS S3 업로드 파일 제거 - 3(完)

이전 글에서 이어집니다. [SpringBoot] AWS S3 이미지 업로드 - 1 토이 프로젝트를 하면서 기록 남겨놓으면 좋을것 같아서 포스팅 AWS 가입, AWS S3 BUCKET 생성과 IAM KEY 발급 과정은 생략하겠음. 트러블 슈팅 https://mag1c.tistory.com/354 https://mag1c.tistory.com/355 https://mag1c.t mag1c.tistory.com [SpringBoot] AWS S3 이미지 업로드 - 2 이전 글에서 이어집니다 https://mag1c.tistory.com/353 아쉬웠던 점은, 계속 S3에 디렉토리가 생긴다는 점이었으며, 이를 위해 코드 수정이 필요했다. 생각보다 엄청 간단했다. @Transactional @Override pu..

[SpringBoot] AWS S3 이미지 업로드 - 2

이전 글에서 이어집니다 [SpringBoot] AWS S3 이미지 업로드 - 1 토이 프로젝트를 하면서 기록 남겨놓으면 좋을것 같아서 포스팅 AWS 가입, AWS S3 BUCKET 생성과 IAM KEY 발급 과정은 생략하겠음. 트러블 슈팅 https://mag1c.tistory.com/354 https://mag1c.tistory.com/355 https://mag1c.t mag1c.tistory.com 아쉬웠던 점은, 계속 S3에 디렉토리가 생긴다는 점이었으며, 이를 위해 코드 수정이 필요했다. 생각보다 엄청 간단했다. @Transactional @Override public boolean img_modify(MultipartFile imgfile, UserDTO dto) throws IOExcepti..

[SpringBoot] AWS S3 이미지 업로드 - 1

토이 프로젝트를 하면서 기록 남겨놓으면 좋을것 같아서 포스팅 AWS 가입, AWS S3 BUCKET 생성과 IAM KEY 발급 과정은 생략하겠음. 트러블 슈팅 https://mag1c.tistory.com/354 https://mag1c.tistory.com/355 https://mag1c.tistory.com/356 개발 환경 SpringBoot3.0.6 build.gradle DI implementation 'org.springframework.cloud:spring-cloud-starter-aws:2.2.6.RELEASE' aplication.properties # S3 cloud.aws.credentials.accessKey=YourKey cloud.aws.credentials.secretKey=..

[Java] 자바에서의 스레드 안전(Thread Safe)과 모니터(monitor)

연관 게시물 스레드 안전 - Thread Safe 연관 게시물 https://mag1c.tistory.com/365 [Java] 자바에서의 스레드 안전(Thread Safe)과 모니터(monitor) 자바에서의 Thread-Safe 1. Lock synchronized 아래 코드는 Synchronized 키워드를 사용하여 스레드의 안전성을 보 mag1c.tistory.com 자바에서의 Thread-Safe 1. Lock synchronized 아래 코드는 Synchronized 키워드를 사용하여 스레드의 안전성을 보장했다. @ThreadSafe public class Lock { @GuardedBy("this") private int nextValue; public synchronized int getN..

스레드 안전 - Thread Safe

연관 게시물 [Java] 자바에서의 스레드 안전(Thread Safe)과 모니터(monitor) 자바에서의 Thread-Safe 1. Lock synchronized 아래 코드는 Synchronized 키워드를 사용하여 스레드의 안전성을 보장했다. @ThreadSafe public class Lock { @GuardedBy("this") private int nextValue; public synchronized int getNext() { r mag1c.tistory.com Thread Safe 스레드 안전(thread safety)은 멀티 스레드 프로그래밍에서 일반적으로 어떤 함수나 변수, 혹은 객체가 여러 스레드로부터 동시에 접근이 이루어져도 프로그램의 실행에 문제가 없음을 뜻한다. 보다 엄밀하게는..

[Java] 스태틱 블록(Static block) (초기화 블록)

기존에 내가 사용하고 자주 봤던 static이 붙은 것들은 public static int a; public static void main(String[] args){} 이정도인데, 업무 내에서 아래와 같은 코드를 발견했다. public Conf { static { loadConfiguration(); } } 얼추 인스턴스가 생성될 때 아래의 메서드를 실행하는 것 정도만 알겠는데 정확히 어떤 것인지 모르겠다. 개념정리를 해놓고 언제든 활용할 수 있도록 해보자. 초기화 블록 class Class { static int Field = 10; // 클래스 변수의 명시적 초기화 int Field2 = 20; // 인스턴스 변수의 명시적 초기화 } 필드는 위와같은 형태로 초기화가 진행되는데, 초기화 블록을 활용하..

Servlet이란?

WEB과 WAS의 차이, WEB이란? WAS란? https://mag1c.tistory.com/299 https://mag1c.tistory.com/300 작은 프로젝트를 두번, 개인 프로젝트를 한번 진행하면서 모두 Apache-Tomcat 서버를 사용하였다. 기존에 알고 있는 바로는 다음과 같다. 1. Apache : WEB Ser mag1c.tistory.com JSP란? (Java Server Pages) https://mag1c.tistory.com/298 https://mag1c.tistory.com/300 JSP (Java Server Pages) JSP(Java Server Pages) HTML내에 자바 코드를 삽입하여 웹 서버에서 동적으로 웹 페이지를 생성하여 웹 브라우저에 돌려주는 서버 ..

[SpringBoot] CoolSMS 이용한 휴대폰 인증

Tech/Java & Spring 2023. 5. 28. 00:00
728x90
728x90

서론

휴대폰과 이메일 중 압도적으로 휴대폰 사용량이 높다고 생각했고

이메일은 가입 시 인증받지 않는 곳도 많기 때문에 우선적으로 휴대폰인증을 구현하려고 했다.


이메일은 필요 시 SMTP 활용하여 구현 예정


기능 구현을 위해 찾아본 아래의 API 중 coolsms를 선택했다.

1. 네이버 SMS

2. Twilio

3. coolSMS

네이버는 한달에 50건이 무료고, Twilio는 가입 시 15달러를 준다고 한다.


cool sms 사용하기

들어가기 앞서 유료임.. SMS를 보내는 것이기 때문에 당연한가 ?


세상에서 가장 안정적이고 빠른 메시지 발송 플랫폼 - 쿨에스엠에스

손쉬운 결제 전용계좌, 신용카드, 계좌이체 등 국내 결제 뿐만 아니라 해용신용카드로 한번의 카드번호 등록으로 자동충전까지 지원합니다. 전용계좌, 신용카드, 계좌이체 등 다양한 결제 방식

coolsms.co.kr


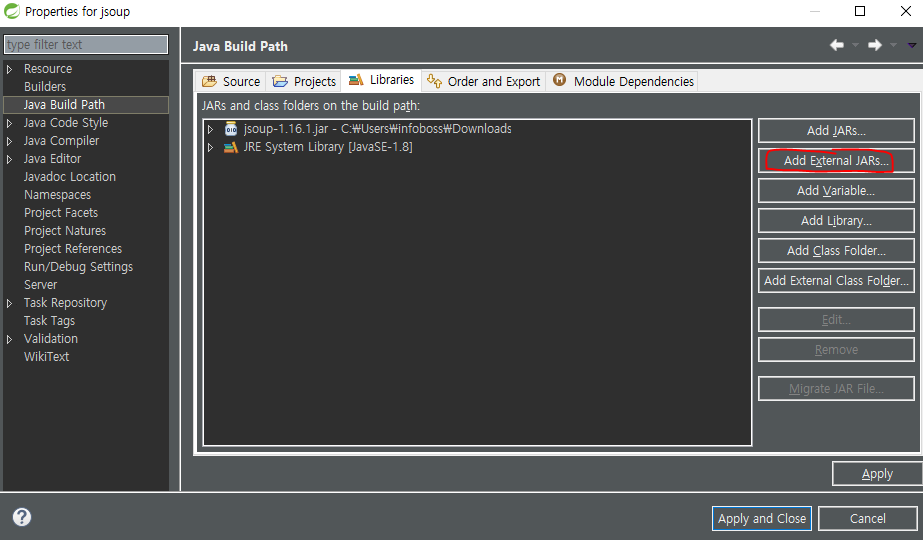
사이트에서 회원가입 및 API KEY, SECRET KEY를 발급받았고


COOLSMS

세상에서 가장 쉽게 메시지를 발송할 수 있도록 도와드립니다. COOLSMS has 20 repositories available. Follow their code on GitHub.

github.com


공식 github가 있고, API 사용 시 예제까지 잘 있으니 참고해서 작성하도록 하자.


적용하기


1. 공식문서 샘플 코드

implementation 'net.nurigo:sdk:4.3.0'
//공식 서
public class ExampleController {
    
    final DefaultMessageService messageService;

    public ExampleController() {
        // 반드시 계정 내 등록된 유효한 API 키, API Secret Key를 입력해주셔야 합니다!
        this.messageService = NurigoApp.INSTANCE.initialize("INSERT_API_KEY", "INSERT_API_SECRET_KEY", "https://api.coolsms.co.kr");
    }
    
}
//공식 문서
public ExampleController{

    @PostMapping("/send-one")
    public SingleMessageSentResponse sendOne() {
        Message message = new Message();
        // 발신번호 및 수신번호는 반드시 01012345678 형태로 입력되어야 합니다.
        message.setFrom("발신번호 입력");
        message.setTo("수신번호 입력");
        message.setText("한글 45자, 영자 90자 이하 입력되면 자동으로 SMS타입의 메시지가 추가됩니다.");

        SingleMessageSentResponse response = this.messageService.sendOne(new SingleMessageSendingRequest(message));
        System.out.println(response);

        return response;
    }
    
}


2. 내 서비스에 맞게 바꾼 코드

DefaultMessageService 및 내 서비스에서 사용하는 UserService, 휴대폰 인증 로직을 수행해 줄 인증담당 Service를 의존성주입 해주었다.


인증담당 Service는 현재 PhoneValidation이지만 차후 이메일인증까지 수행할 경우 네이밍을 변경하여 같이 사용할 예정이다.

@RequiredArgsConstructor
@Controller
@RequestMapping("/users")
public class UserController {
	
	final UserService userService;
	final DefaultMessageService defaultMessageService;
	final PhoneValidationService phoneValidationService;
	
	@Autowired
	public UserController(UserService userService, PhoneValidationService phoneValidationService) {
		this.userService = userService;
		this.defaultMessageService = NurigoApp.INSTANCE.initialize("NCS1QZEXH48DE8O1", "12MPLZHBL3SP13B2EEDVNRRTW0Z6OO7O", "https://api.coolsms.co.kr");
		this.phoneValidationService = phoneValidationService;
	}

}


1. 인증 문자 보내기

@PostMapping("/validation/phone")
@ResponseBody
public SingleMessageSentResponse sendSMS(String phone, HttpSession ss) {
    String ran_str = phoneValidationService.getValidationCode();		
    Message msg = phoneValidationService.getMsgForm(ran_str, phone);	
    SingleMessageSentResponse response = this.defaultMessageService.sendOne(new SingleMessageSendingRequest(msg));

    ss.setAttribute("validation", ran_str);
    ss.setAttribute("message_id", response.getMessageId());
    ss.setMaxInactiveInterval(180);

    return response;		
}
@Override
public String getValidationCode() {
    String ran_str = "";
    for(int i=0; i<6; i++) {
        ran_str += (int)(Math.random()*10);
    }
    return ran_str;
}

@Override
public Message getMsgForm(String ran_str, String phone) {
    Message msg = new Message();

    msg.setFrom("01024402059");
    msg.setTo(phone);
    msg.setText("[randomchatUNI] 아래의 인증번호를 입력해주세요\n" + ran_str);

    return msg;
}


1. 인증번호를 생성했다. 6자리의 랜덤한 숫자가 생성된다.


2. API에서 제공하는 Message객체를 리턴시켜 phone 에 들어있는 휴대폰번호로 인증메세지가 간다.


3. 세션에 임시로 SingleMessageSentResponse의 객체(API 제공) 중 인증에 활용할 수 있는 messageID의 Value를 유효기간을 담아 인증번호를 검증할 수 있도록 하였다.


3번의 경우. DB에 임시로 테이블을 생성해서, 유효기간이 만료되면 해당 Row를 삭제하게 할 지 세션에 등록할 지 고민하다가 세션으로 했다.


테이블과 세션 중 고려할 때


테이블은 insert, select, delete 쿼리를 한 인증에서 한 번이상 무조건 수행해야 하며, 인증시간이 만료됐을 때 delete를 또한 실행해야 하기 때문에 비효율적이라고 판단했다.


하지만 세션의 경우에도, 유효기간을 설정할 수 있지만, 세션을 이용한 다른 비즈니스 로직에도 영향을 끼칠 수 있다고 생각했다. 물론 여러 Session을 생성하여 관리하거나, 해당 세션의 Key값을 확실하게 기억할 수 있다면 예방할 수 있다고 판단했다.


근데 근본적으로, 해당 토이 프로젝트 내에서 세션을 활용하여 진행할 사항이 로그인, 로그아웃 시 세션을 등록하고 지우고 하는 것 밖에 없는데, 딱히 세션유효기간을 설정해서 사용하지 않을 것이기 때문에 Security만을 사용한 로그인 로그아웃을 사용하고 있기 때문에, 그냥 세션을 활용하기로 했다.


@GetMapping
public String signup(@AuthenticationPrincipal User user, HttpSession ss) {
    if(user != null) return "redirect:/uni/main";
    ss.invalidate(); //validation phone clear
    return "users/signup";
}


또한 회원가입 페이지에 다시 접근 시, 세션을 초기화해주었다. 세션을 인증 이외에는 사용하지 않을 것이기 때문에 상관 없을 것다.


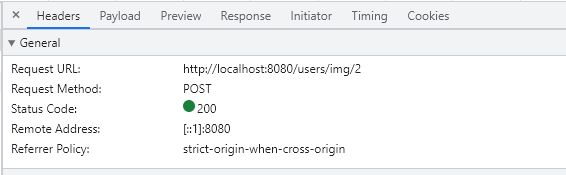
아래는 리턴받은 API의 response 객체이다.


2. 받은 인증번호 검증하기

@GetMapping("/validation/phone")
@ResponseBody
public String validationSMS(String validation, HttpSession ss) {
    return phoneValidationService.validationSMS(validation, ss);
}
@Override
public String validationSMS(String validation, HttpSession ss) {
    if(ss.getAttribute("message_id") == null || ss.getAttribute("validation") == null) return "인증번호 만료, 처음부터 다시 시도해주세요";
    else {
        if(ss.getAttribute("validation").equals(validation)) return "인증 완료";
        else return "인증 실패";
    }		
}


세션에 값이 없는 경우는 내가 설계한 로직에 어긋나는 것이고

인증번호 자체가 다른경우는 뭐.. 말할 것도 없다


3. 확인하기


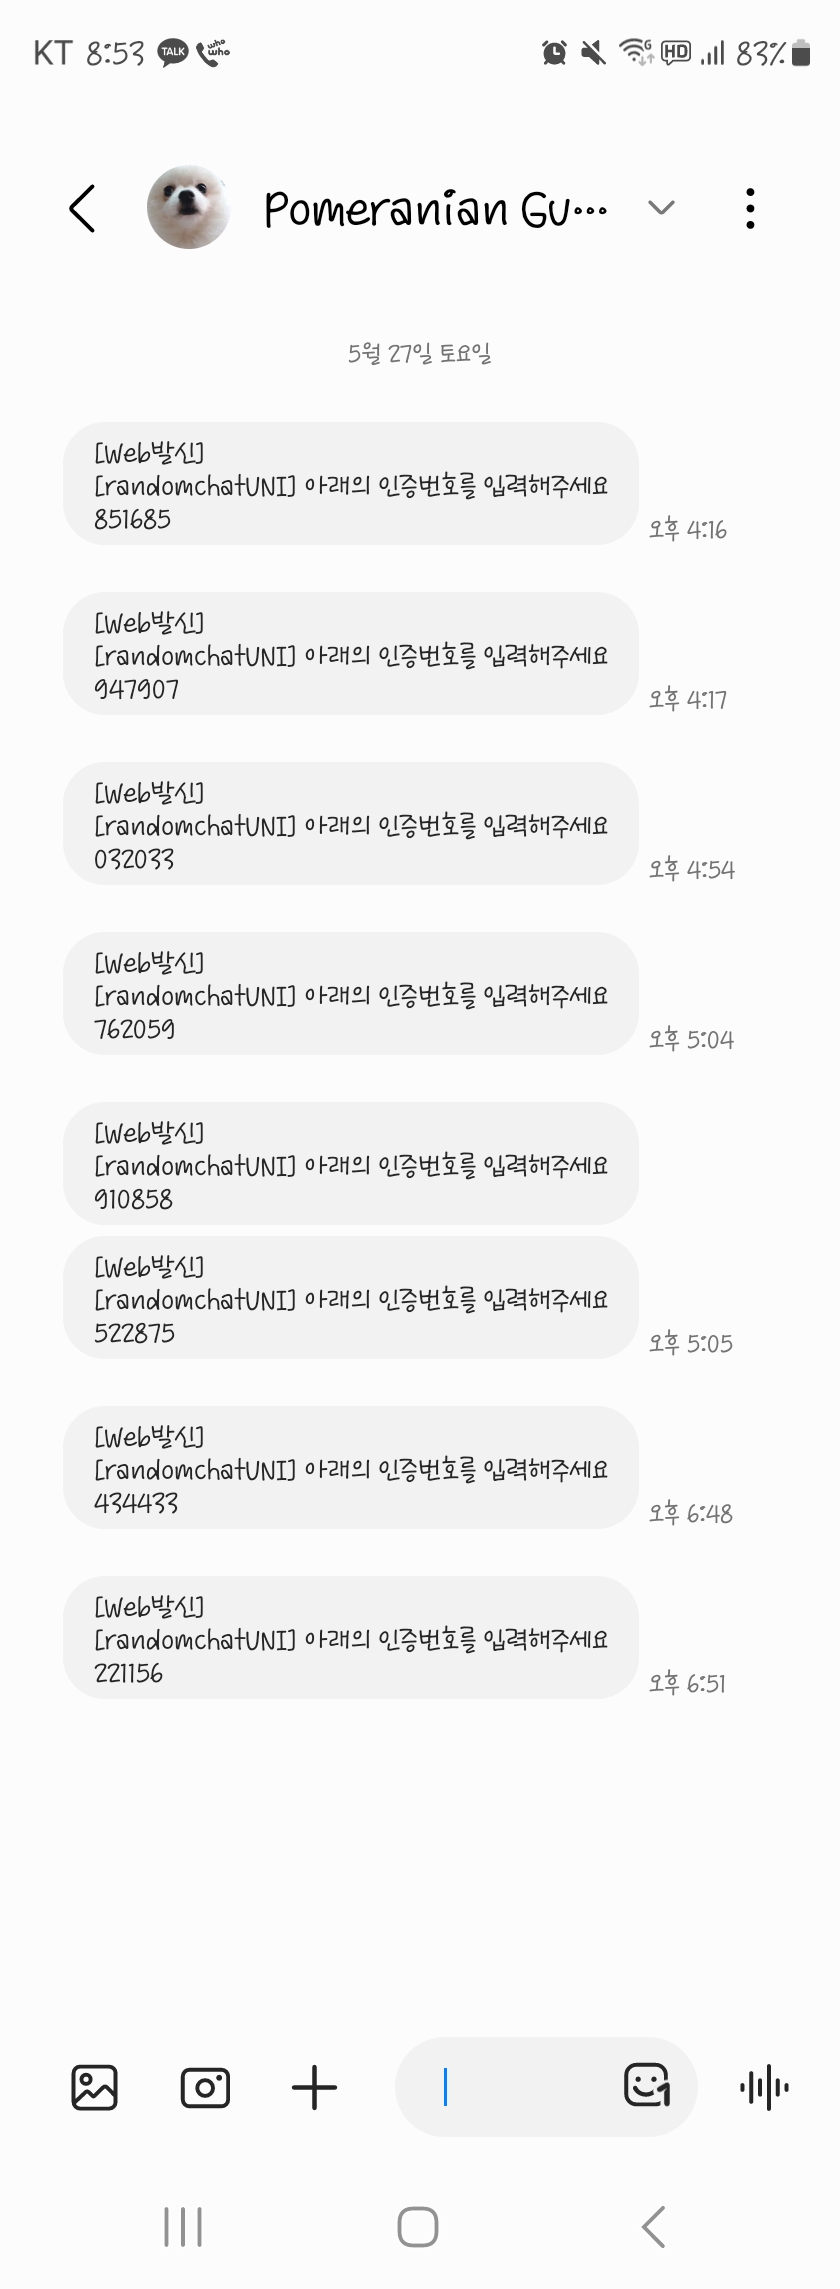
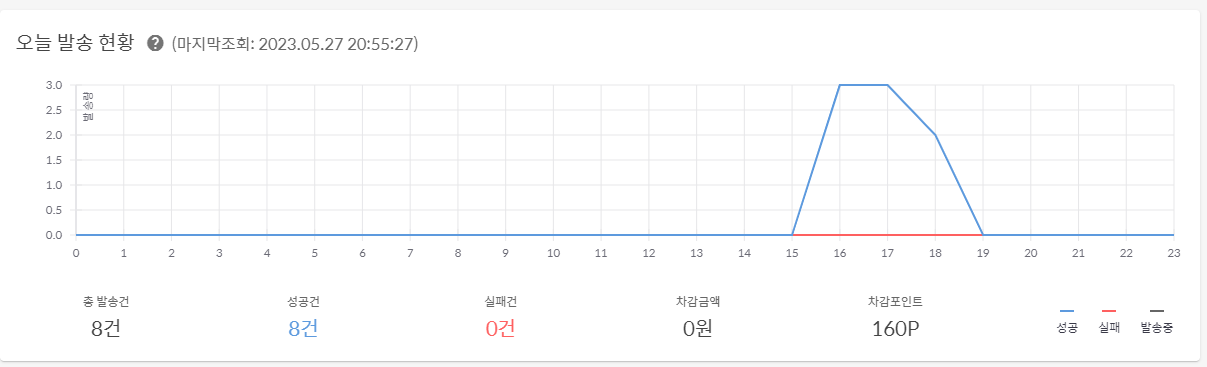
이래저래 검증해본다고 8통을 보냈는데


아무래도 coolSMS에서는 300원을 기본으로 주고 한통당 20원으로 책정하나보다


728x90
300x250
mag1c

mag1c

2년차 주니어 개발자.

[SpringBoot] AWS S3 업로드 파일 제거 - 3(完)

Tech/Java & Spring 2023. 5. 27. 20:37
728x90
728x90

이전 글에서 이어집니다.


[SpringBoot] AWS S3 이미지 업로드 - 1

토이 프로젝트를 하면서 기록 남겨놓으면 좋을것 같아서 포스팅 AWS 가입, AWS S3 BUCKET 생성과 IAM KEY 발급 과정은 생략하겠음. 트러블 슈팅 https://mag1c.tistory.com/354 https://mag1c.tistory.com/355 https://mag1c.t

mag1c.tistory.com


[SpringBoot] AWS S3 이미지 업로드 - 2

이전 글에서 이어집니다 https://mag1c.tistory.com/353 아쉬웠던 점은, 계속 S3에 디렉토리가 생긴다는 점이었으며, 이를 위해 코드 수정이 필요했다. 생각보다 엄청 간단했다. @Transactional @Override public bo

mag1c.tistory.com


이전까지의 이슈사항이라 생각했던 것들을 해결했다.


1. 서비스 배포 시 유저들이 이미지 변경이 잦아지면 잦아질수록 S3에 이미지들이 많이 쌓이는 문제

(어짜피 이전 이미지들을 활용하지 않을 것이기 때문에 삭제 요망)


2. 용량 제한

  - 이 부분은 아직 반밖에 해결 못했다. 프론트와 백단에서 용량 제한을 걸어놓았지만 예외처리 제어를 하지 못해서 용량 초과가 나는 부분에 대해 사용자에게 에러코드를 보여주고 있다. ExceptionHandle을 조금 더 익혀서 포스팅하도록 하겠다.


우선, 기존의 form action을 ajax로 처리하였다.

이제 유저가 이미지 변경 시 이미지를 view해주는 부분만 렌더링되어 보여질 것이다.

function imgUpload(file, idx){
	var formData = new FormData();
	formData.append("imgfile", file);
	
	$.ajax({
		type : "PUT",
		url : "/users/img/"+idx,
		processData : false,
		contentType : false,
		data : formData,
		enctype : 'multipart/form-data',
		success : function(msg){
			if(msg.includes("실패")) alert(msg.split(":")[0]);
			else user_img.src = msg;
		},error : function(err){
			console.log(err);
		}
	})
}


아래의 서비스로직도 수정했다.

원래 생각했던 것은, S3에 업로드된 해당 유저의 모든 이미지를 지우고 하나만 딱 남겨두게 하려고 했다.

하지만 AWS S3에서는 파일 삭제시 해당 파일의 Key값(디렉토리와 파일 이름인 것 같다)이 필요하여


알지 못하는 Key에 대해 삭제처리가 되지 않았다.

@Transactional
@Override
public boolean img_modify(MultipartFile imgfile, UserDTO dto) throws IOException {
    if(!imgfile.isEmpty()) {
        UserEntity user = userRepository.findByIdx(dto.getIdx()).get();
        String url = "https://randomchatuni.s3.ap-northeast-2.amazonaws.com/";
        String beforeImg = user.getImg()==null ? null : user.getImg().replace(url, "");

        if(beforeImg != null) beforeImg = URLDecoder.decode(beforeImg, "UTF-8");

        String serverFileName = s3Uploader.upload(imgfile, user.getId(), beforeImg);
        dto.setImg(serverFileName);

        user.setImg(serverFileName);
        return true;
    }		
    else return false;		
}


https://URL/diehreo2/%EC%BA%A1%EC%B2%98.jpg


이미지 저장 시, 위와 같은 형태로 이미지가 저장되고 있었는데

여기서 S3가 요구하는 Key값은 디렉토리 + 파일명이기 때문에, 앞의 URL은 replace를 통해 없애주었고

정확한 파일명이 요구되기 때문에 디코딩을 통해 파일명을 가져왔다.


삭제를 위해 가져온 정보 또한 업로드를 수행하는 객체에 보내줬다.


마지막으로 업로더 객체 또한 수정했다.

private String upload(File uploadFile, String dirName, String beforeImg) {
    if(beforeImg != null) removeS3(beforeImg);
    String fileName = dirName + "/" + uploadFile.getName();
    String uploadImageUrl = putS3(uploadFile, fileName);

    removeNewFile(uploadFile);
    
    return uploadImageUrl;
}

private void removeS3(String fileName) {
    try {
        amazonS3Client.deleteObject(bucket, fileName);
        System.out.println("S3 Uploded file remove success.");
    } catch (AmazonServiceException e) {
        System.out.println("S3 Uploded file remove fail.");
        System.err.println(e.getErrorMessage());
        System.exit(1);
    }		
}


유저의 이미지가 없을 경우를 null로 두었고, 이전 이미지가 있을 경우 해당 이미지를 지우는 로직을 작성했고


해당 코드는 AWS 공식 문서의 AWS S3 Example에 자세히 나와있다.


Performing Operations on Amazon S3 Objects - AWS SDK for Java 1.x

You can use copyObject with deleteObject to move or rename an object, by first copying the object to a new name (you can use the same bucket as both the source and destination) and then deleting the object from its old location.

docs.aws.amazon.com


삭제가 잘 된 모습이다


AWS S3 업로드, 삭제 관련은 이정도로 마쳐도 될 것 같다.


해당 기능 작업을 하면서 에러 핸들링에 대해 깊게 공부해 봐야겠다는 생각이 들었다.


에러 핸들링에 대해 공부를 빡세게 예외처리를 잘할 수 있게 성장해야겠다.


공부한 내용을 정리해서 포스팅 할 수 있도록 해야지


끝~


728x90
300x250
mag1c

mag1c

2년차 주니어 개발자.

[SpringBoot] AWS S3 이미지 업로드 - 2

Tech/Java & Spring 2023. 5. 27. 06:48
728x90
728x90

이전 글에서 이어집니다


[SpringBoot] AWS S3 이미지 업로드 - 1

토이 프로젝트를 하면서 기록 남겨놓으면 좋을것 같아서 포스팅 AWS 가입, AWS S3 BUCKET 생성과 IAM KEY 발급 과정은 생략하겠음. 트러블 슈팅 https://mag1c.tistory.com/354 https://mag1c.tistory.com/355 https://mag1c.t

mag1c.tistory.com


아쉬웠던 점은, 계속 S3에 디렉토리가 생긴다는 점이었으며, 이를 위해 코드 수정이 필요했다.


생각보다 엄청 간단했다.


@Transactional
@Override
public boolean img_modify(MultipartFile imgfile, UserDTO dto) throws IOException {
    if(!imgfile.isEmpty()) {			
        String uuid = UUID.randomUUID().toString();	        
        String serverFileName = s3Uploader.upload(imgfile, dto.getId()+uuid);
        System.out.println(imgfile + "  :  " + dto.getId()+uuid);
        System.out.println("serverFileName : " + serverFileName);
        dto.setImg(serverFileName);
 
        Optional<UserEntity> User = userRepository.findByIdx(dto.getIdx());
        User.get().setImg(serverFileName);
        return true;
    }		
    else return false;		
}


기존 로직은, UUID를 유저의 ID와 합쳐서 새로운 디렉토리를 만들고 있었다.

(또한 여기서, 유저의 ID값을 받아오지 못하고 있었는데 수정하면서 캐치했다 ... ;;;)


@Transactional
@Override
public boolean img_modify(MultipartFile imgfile, UserDTO dto) throws IOException {
    if(!imgfile.isEmpty()) {			
        String serverFileName = s3Uploader.upload(imgfile, userRepository.findByIdx(dto.getIdx()).get().getId());
        dto.setImg(serverFileName);

        Optional<UserEntity> User = userRepository.findByIdx(dto.getIdx());
        User.get().setImg(serverFileName);
        return true;
    }		
    else return false;		
}


User의 ID로 디렉토리를 생성할 수 있게 코드를 수정해줬다. (ID를 받아오게 수정 또한 해주었다)


이전의, 엄청 많은 디렉토리에서, 해당 유저의 디렉토리 하나만 생성되도록 로직이 정상 적용되었으며,


디렉토리 안에 차곡차곡 이미지가 들어간다.


여기서 또 문제점이 보였는데, 내가 구현하고 있는 로직은 현재 단순 프로필 이미지를 변경하는 기능이다.


만약 서비스가 배포되고, 유저의 수가 많아지면 이전 이미지를 삭제시키지 못해서 S3에 엄청 많은 이미지가 쌓일 것 같다. 또한 이미지 용량 제한도 아직 걸어놓지 않았다.

용량 제한이라던가, 요금 같은걸 자세히 알지는 못하지만. 분명 이슈사항이 될 수 있다고 생각.


업로드 시 이전 이미지를 삭제시킬 방법을 찾아 와서 포스팅하도록 해야겠다.


아마 저기 저 마지막 수정일자가 최신인 녀석 하나만 빼고 다 삭제시킬 수 있는 방법이 있지 않을까????

728x90
300x250
mag1c

mag1c

2년차 주니어 개발자.

[SpringBoot] AWS S3 이미지 업로드 - 1

Tech/Java & Spring 2023. 5. 26. 06:29
728x90
728x90

토이 프로젝트를 하면서 기록 남겨놓으면 좋을것 같아서 포스팅


AWS 가입, AWS S3 BUCKET 생성과 IAM KEY 발급 과정은 생략하겠음.


트러블 슈팅

https://mag1c.tistory.com/354

https://mag1c.tistory.com/355 

https://mag1c.tistory.com/356 


개발 환경

SpringBoot3.0.6


build.gradle DI

implementation 'org.springframework.cloud:spring-cloud-starter-aws:2.2.6.RELEASE'


aplication.properties

# S3
cloud.aws.credentials.accessKey=YourKey
cloud.aws.credentials.secretKey=YourKey
cloud.aws.s3.bucket=YourBucket
cloud.aws.s3.domain=YourDomain
cloud.aws.region.static=ap-northeast-2
cloud.aws.stack.auto=false


Config 생성

package com.uu.uni.config;

import org.springframework.beans.factory.annotation.Value;
import org.springframework.context.annotation.Bean;
import org.springframework.context.annotation.Configuration;

import com.amazonaws.auth.AWSCredentials;
import com.amazonaws.auth.AWSStaticCredentialsProvider;
import com.amazonaws.auth.BasicAWSCredentials;
import com.amazonaws.services.s3.AmazonS3;
import com.amazonaws.services.s3.AmazonS3ClientBuilder;

@Configuration
public class S3Config {
    @Value("${cloud.aws.credentials.accessKey}")
    private String accessKey;

    @Value("${cloud.aws.credentials.secretKey}")
    private String secretKey;

    @Value("${cloud.aws.region.static}")
    private String region;

    @Bean
    public AmazonS3 amazonS3Client() {
        AWSCredentials credentials = new BasicAWSCredentials(accessKey, secretKey);

        return AmazonS3ClientBuilder
                .standard()
                .withCredentials(new AWSStaticCredentialsProvider(credentials))
                .withRegion(region)
                .build();
    }

}


Uploader 객체 생성

로컬에 생성되는 이미지 파일은 삭제된다.(MultipartFile을 File로 전환하는 과정에서 파일이 생성된다.)

AmazonS3Client가 deprecated되어, AmazonS3을 사용했다 (필드)

package com.uu.uni.user.service;

import com.amazonaws.services.s3.AmazonS3Client;
import com.amazonaws.services.s3.model.CannedAccessControlList;
import com.amazonaws.services.s3.model.PutObjectRequest;
import lombok.RequiredArgsConstructor;
import lombok.extern.slf4j.Slf4j;
import org.springframework.beans.factory.annotation.Value;
import org.springframework.stereotype.Component;
import org.springframework.stereotype.Service;
import org.springframework.web.multipart.MultipartFile;

import java.io.File;
import java.io.FileOutputStream;
import java.io.IOException;
import java.util.Optional;

@Slf4j
@RequiredArgsConstructor
@Component
@Service
public class S3Uploader {

    private final AmazonS3 amazonS3Client;

    @Value("${cloud.aws.s3.bucket}")
    private String bucket;

    public String upload(MultipartFile multipartFile, String dirName) throws IOException {
        File uploadFile = convert(multipartFile)
                .orElseThrow(() -> new IllegalArgumentException("MultipartFile -> File change fail"));
        return upload(uploadFile, dirName);
    }

    private String upload(File uploadFile, String dirName) {
        String fileName = dirName + "/" + uploadFile.getName();
        String uploadImageUrl = putS3(uploadFile, fileName);

        removeNewFile(uploadFile);

        return uploadImageUrl; 
    }

    private String putS3(File uploadFile, String fileName) {
        amazonS3Client.putObject(
                new PutObjectRequest(bucket, fileName, uploadFile)
                        .withCannedAcl(CannedAccessControlList.PublicRead)
        );
        return amazonS3Client.getUrl(bucket, fileName).toString();
    }

    private void removeNewFile(File targetFile) {
        if(targetFile.delete()) {
            log.info("delete success.");
        }else {
            log.info("delete fail.");
        }
    }

    private Optional<File> convert(MultipartFile file) throws  IOException {
        File convertFile = new File(file.getOriginalFilename());
        if(convertFile.createNewFile()) {
            try (FileOutputStream fos = new FileOutputStream(convertFile)) {
                fos.write(file.getBytes());
            }
            return Optional.of(convertFile);
        }
        return Optional.empty();
    }

}


View, Controller, Service 작성

1. View + JS (파일 보내기)

<form th:method="post" th:action="@{|/users/img/${idx}|}" name="imgchange" enctype="multipart/form-data">
    <input type="file" name="imgfile" style="display : none;">
    <input type="hidden" name="idx" th:value="${idx}">		
    <input type="hidden" name="img">
</form>
const img_upload = document.querySelector(".img_upload");
const input_file = document.querySelector("input[type='file']");
const filename = document.querySelector("input[name='img']");

function imgUpload(){
	input_file.click();
}

img_upload.addEventListener('click', function(){
	imgUpload();
});

input_file.addEventListener('change', function(){
	filename.value = this.files[0];	
	document.imgchange.submit();
});


2. Controller, Service

@ResponseBody
@PostMapping("/img/{idx}")
public String img_modify(@PathVariable int idx, @RequestParam("imgfile") MultipartFile imgfile, UserDTO dto) throws IOException {
    if(userService.img_modify(imgfile, dto)) return "성공";
    else return "실패";
}


컨트롤러에서, 성공 실패 여부를 확인하기 위해 ResponseBody로 걍 Text를 찍어보려고 했다.


public boolean img_modify(MultipartFile imgfile, UserDTO dto) throws IOException;
@Transactional
@Override
public boolean img_modify(MultipartFile imgfile, UserDTO dto) throws IOException {
    if(!imgfile.isEmpty()) {			
        String uuid = UUID.randomUUID().toString();	        
        String serverFileName = s3Uploader.upload(imgfile, dto.getId()+uuid);
        System.out.println(imgfile + "  :  " + dto.getId()+uuid);
        System.out.println("serverFileName : " + serverFileName);
        dto.setImg(serverFileName);

        Optional<UserEntity> User = userRepository.findByIdx(dto.getIdx());
        User.get().setImg(serverFileName);
        return true;
    }		
    else return false;		
}


서비스에서 위의 S3Uploader를 통해 AWS S3에 업로드 된다.


결과


잘 들어오지만, 업로드 할 때마다 디렉토리가 생성되어, 이를 수정할 생각이다.

728x90
300x250
mag1c

mag1c

2년차 주니어 개발자.

[Java] 자바에서의 스레드 안전(Thread Safe)과 모니터(monitor)

Tech/Java & Spring 2023. 5. 25. 08:18
728x90
728x90

연관 게시물


스레드 안전 - Thread Safe

연관 게시물 https://mag1c.tistory.com/365 [Java] 자바에서의 스레드 안전(Thread Safe)과 모니터(monitor) 자바에서의 Thread-Safe 1. Lock synchronized 아래 코드는 Synchronized 키워드를 사용하여 스레드의 안전성을 보

mag1c.tistory.com


자바에서의 Thread-Safe


1. Lock


synchronized

아래 코드는 Synchronized 키워드를 사용하여 스레드의 안전성을 보장했다.

@ThreadSafe
public class Lock {
    @GuardedBy("this") private int nextValue;

    public synchronized int getNext() {
        return nextValue++;
    }
}

Lock 클래스의 getNext()메서드의 동시성을 보장한다.


getNext()에 접근할 수 있는 스레드를 단 한개만 보장한다는 뜻이며, 수많은 스레드들이 동시에 getNext()에 접근하더라도, 정확한 nextValue값을 보장받을 수 있다.


아래 코드는 synchronized 블록을 사용한 monitor pattern의 예제이다.

public class Lock2 {
    private final Object myLock = new Object();
    @GuardedBy("myLock") Widget widget;

    void someMethod() {
        synchronized (myLock) {
        }
    }
}

자바에서 모든 객체는 monitor를 가질 수 있는데, monitor는 여러 스레드가 동시에 객체로 접근하는 것을 막는 역할을 한다.


heap영역에 있는 객체는 모든 스레드에서 공유가 가능한데, 스레드가 monitor를 가지면 monitor를 가지는 객체에 lock를 걸 수 있다.


그렇게되면 다른 thread들이 해당 객체에 접근할 수 없게 된다.


motinor를 가질수 있는 것은 synchronized 키워드 내에서 가능한데, 여기서 myLock이 파라미터로 들어가면서, thread가 해당 객체의 monitor를 가질 수 있게 되고 해당 객체는 thread에 의해 공유될 수 있는 객체가 된다.


이해가 될 것 같으면서도 애매해서 구글링을 해서 가장 이해가 잘 된 예제를 더 들고왔다.


[Java] 스레드 monitor란?

자바에서 모든 객체는 monitor를 가지고 있다. monitor는 여러 스레드가 객체로 동시에 객체로 접근하는 것을 막는다. 여기서 모든 객체가 중요하다. heap 영역에 있는 객체는 모든 스레드에서 공유

bgpark.tistory.com

class Hello implement Runnable {

    @Override
    public void run() {
      String hello = "hello";
      synchronized (hello) {
          System.out.println(hello);
      }
    }
}


위의 코드를 디컴파일 한 결과


synchronized구문을 기점으로 monitorenter와 exit가 존재한다.


스레드가 monitorenter을 가리키면 monitor의 소유권을 얻게 되며


monitorexit를 가리키면 monitor를 놓아준다. 이 때 다른 스레드들이 monitorenter가 가능해지면서 monitor를 얻게된다.


즉, monitor의 생명주기는 synchronized 키워드에 의존되며, 객체가 가지는 wait(), notify(), notifyAll()메서드는 모두 synchronized 블록에서만 유의미하고, 해당 메서드로부터 스레드를 waitset에 넣거나 불러올 수 있게 된다.


2. 자료구조


선택이 가능하다면 synchronized보다는 더 좋은 방법이다.

Hashtable, ConcurrentHashMap, AtomicInteger, BlockingQueue등이 있다.


어떤 자료구조를 사용하느냐에 따라 성능이 저하될 수 있기 때문에 상황에 맞는 자료구조를 사용하는 것이 바람직하다.


public synchronized V get(Object key) {
    Entry<?,?> tab[] = table;
    int hash = key.hashCode();
    int index = (hash & 0x7FFFFFFF) % tab.length;
    for (Entry<?,?> e = tab[index] ; e != null ; e = e.next) {
        if ((e.hash == hash) && e.key.equals(key)) {
            return (V)e.value;
        }
    }
    return null;
}

...


public synchronized V put(K key, V value) {
    // Make sure the value is not null
    if (value == null) {
        throw new NullPointerException();
    }

    // Makes sure the key is not already in the hashtable.
    Entry<?,?> tab[] = table;
    int hash = key.hashCode();
    int index = (hash & 0x7FFFFFFF) % tab.length;
    @SuppressWarnings("unchecked")
    Entry<K,V> entry = (Entry<K,V>)tab[index];
    for(; entry != null ; entry = entry.next) {
        if ((entry.hash == hash) && entry.key.equals(key)) {
            V old = entry.value;
            entry.value = value;
            return old;
        }
    }

    addEntry(hash, key, value, index);
    return null;
}

...
public V get(Object key) {
    Node<K,V>[] tab; Node<K,V> e, p; int n, eh; K ek;
    int h = spread(key.hashCode());
    if ((tab = table) != null && (n = tab.length) > 0 &&
        (e = tabAt(tab, (n - 1) & h)) != null) {
        if ((eh = e.hash) == h) {
            if ((ek = e.key) == key || (ek != null && key.equals(ek)))
                return e.val;
        }
        else if (eh < 0)
            return (p = e.find(h, key)) != null ? p.val : null;
        while ((e = e.next) != null) {
            if (e.hash == h &&
                ((ek = e.key) == key || (ek != null && key.equals(ek))))
                return e.val;
        }
    }
    return null;
}

...


public V put(K key, V value) {
    return putVal(key, value, false);
}

/** Implementation for put and putIfAbsent */
final V putVal(K key, V value, boolean onlyIfAbsent) {
    if (key == null || value == null) throw new NullPointerException();
    int hash = spread(key.hashCode());
    int binCount = 0;
    for (Node<K,V>[] tab = table;;) {
        Node<K,V> f; int n, i, fh;
        if (tab == null || (n = tab.length) == 0)
            tab = initTable();
        else if ((f = tabAt(tab, i = (n - 1) & hash)) == null) {
            if (casTabAt(tab, i, null,
                         new Node<K,V>(hash, key, value, null)))
                break;                   // no lock when adding to empty bin
        }
        else if ((fh = f.hash) == MOVED)
            tab = helpTransfer(tab, f);
        else {
            V oldVal = null;
            synchronized (f) {
                if (tabAt(tab, i) == f) {
                    if (fh >= 0) {
                        binCount = 1;
                        for (Node<K,V> e = f;; ++binCount) {
                            K ek;
                            if (e.hash == hash &&
                                ((ek = e.key) == key ||
                                 (ek != null && key.equals(ek)))) {
                                oldVal = e.val;
                                if (!onlyIfAbsent)
                                    e.val = value;
                                break;
                            }
                            Node<K,V> pred = e;
                            if ((e = e.next) == null) {
                                pred.next = new Node<K,V>(hash, key,
                                                          value, null);
                                break;
                            }
                        }
                    }
                    else if (f instanceof TreeBin) {
                        Node<K,V> p;
                        binCount = 2;
                        if ((p = ((TreeBin<K,V>)f).putTreeVal(hash, key,
                                                       value)) != null) {
                            oldVal = p.val;
                            if (!onlyIfAbsent)
                                p.val = value;
                        }
                    }
                }
            }
            if (binCount != 0) {
                if (binCount >= TREEIFY_THRESHOLD)
                    treeifyBin(tab, i);
                if (oldVal != null)
                    return oldVal;
                break;
            }
        }
    }
    addCount(1L, binCount);
    return null;
}


위는 Hashtable, 아래는 ConcurrentHashMap의 메서드들이다.


Hashtable의 주요 메서드들은 전부 synchronized 키워드에 감싸진 상태로 동시성을 보장하기 때문에,

메서드를 호출할 수 있는 스레드는 반드시 1개라는 뜻이다.


ConcurrentHashMap의 get()메서드는 volatile 변수를 사용해 가시성을 보장하도록 되어있고 put()은 부분적으로 synchronized를 사용한다.


자바 1.5부터 Hashtable의 성능을 향상시키기 위해 ConcurrentHashMap을 도입했다.


Thread-safe Hash Map in Java and their performance benchmark – ASJAVA.COM

Thread-safe Hash Map in Java and their performance benchmark Автор admin На чтение 7 мин Просмотров 583 Опубликовано 09.10.2013 1. Java Thread-safe Map Overview The Map object is an associative containers that store el

asjava.com


3. Stack 한정 프로그래밍

모든 스레드가 각자 고유한 스택과 지역변수를 가진다는 특성을 잘 이해하면 동시성을 보장하도록 할 수 있다.

public class Animals {
    Ark ark;
    Species species;
    Gender gender;

    public int loadTheArk(Collection<Animal> candidates) {
        SortedSet<Animal> animals;
        int numPairs = 0;
        Animal candidate = null;

        animals = new TreeSet<Animal>(new SpeciesGenderComparator());
        animals.addAll(candidates);
        for (Animal a : animals) {
            if (candidate == null || !candidate.isPotentialMate(a))
                candidate = a;
            else {
                ark.load(new AnimalPair(candidate, a));
                ++numPairs;
                candidate = null;
            }
        }
        return numPairs;
    }
}


animals 인스턴스는 지역변수로 선언되어 있다.

candidates 팔미터를 복사(addAll)한 뒤에 추가적인 작업을 실행하는데, 지역변수 내부(Stack)에서만 사용했기 때문에 동시성을 보장할 수 있다.


4. ThreadLocal

지역변수를 사용해 동시성을 보장하는 방법은 간결하고 이해하기 쉽다.

하지만 저 메서드 스택을 벗어나는 순간 animals 변수의 참조가 없어지기 때문에

다른 곳에서는 animals를 사용할 수 없다.


위와 같은 단점을 해결하기 위해 자바에서는 ThreadLocal 클래스를 제공하고 있다.


ThreadLocal을 사용하여 스레드 영역에 변수를 설정할 수 있기 때문에, 특정 스레드가 실행하는 모든 코드에서 그 스레드에 설정된 변수 값을 사용할 수 있게 된다.


대표적으로 SpringSecurity에서 제공하는 SecurityContextHolder가 있다.


ThreadLocal<UserInfo> local = new ThreadLocal<UserInfo>();
local.set(currentUser);
UserInfo userInfo = local.get();

ThreadLocal 객체를 생성할 수 있다.

set(), get(), remove()를 이용해 현재 쓰레드의 로컬변수에 값을 저장하고 읽고, 삭제할 수 있다.


자세한 활용방법은 아래를 참조하여 공부를 진행했다.


ThreadLocal 사용법과 활용

자바 1.2 버전부터 제공되고 있지만 아직 다수의 개발자들이 잘 몰라서 활용을 잘 못하는 기능이 하나 있는데, 그 기능이 바로 쓰레드 단위로 로컬 변수를 할당하는 기능이다. 이 기능은 ThreadLocal

javacan.tistory.com


5. 불변객체 사용(final)

자바에서 대표적인 불변 객체(완전히 생성된 후에도 내부 상태가 유지되는 객체)

 String이며, String은 스레드에 안전하다.


Immutable Classes in Java - HowToDoInJava

Learn about immutable objects, records and collections in Java and create a Java class immutable step by step with examples.

howtodoinjava.com


import java.util.Date;
 
/**
* Always remember that your instance variables will be either mutable or immutable.
* Identify them and return new objects with copied content for all mutable objects.
* Immutable variables can be returned safely without extra effort.
* */
public final class ImmutableClass
{
 
    /**
    * Integer class is immutable as it does not provide any setter to change its content
    * */
    private final Integer immutableField1;
 
    /**
    * String class is immutable as it also does not provide setter to change its content
    * */
    private final String immutableField2;
 
    /**
    * Date class is mutable as it provide setters to change various date/time parts
    * */
    private final Date mutableField;
 
    //Default private constructor will ensure no unplanned construction of class
    private ImmutableClass(Integer fld1, String fld2, Date date)
    {
        this.immutableField1 = fld1;
        this.immutableField2 = fld2;
        this.mutableField = new Date(date.getTime());
    }
 
    //Factory method to store object creation logic in single place
    public static ImmutableClass createNewInstance(Integer fld1, String fld2, Date date)
    {
        return new ImmutableClass(fld1, fld2, date);
    }
 
    //Provide no setter methods
 
    /**
    * Integer class is immutable so we can return the instance variable as it is
    * */
    public Integer getImmutableField1() {
        return immutableField1;
    }
 
    /**
    * String class is also immutable so we can return the instance variable as it is
    * */
    public String getImmutableField2() {
        return immutableField2;
    }
 
    /**
    * Date class is mutable so we need a little care here.
    * We should not return the reference of original instance variable.
    * Instead a new Date object, with content copied to it, should be returned.
    * */
    public Date getMutableField() {
        return new Date(mutableField.getTime());
    }
 
    @Override
    public String toString() {
        return immutableField1 +" - "+ immutableField2 +" - "+ mutableField;
    }
}


setter메서드가 없고, 생성자가 private로 선언되어있으며, 실제 인스턴스는 팩토리 메서드를 통해 생성하도록 public이다. 또한 모든 멤버변수들은 final로 선언되어 있는데, Integer나 String은 기본적으로 불변이기 때문에 반환할 때도 그대로 리턴해도 되지만, Date의 경우 가변객체이기 때문에 반드시 방어적 복사본을 생성하는 방법으로 프로그래밍을 해야 동시성을 보장받을 수 있다.


적절한 final키워드도 별다른 동기화작업 없이 동시성환경에서 자유롭게 사용할 수 있다. 불변 객체와 비슷한 관점으로 초기화된 이후에 변경될 수 없기 때문에 여러 스레드가 동시에 접근해도 동일한 값을 보장받을 수 있다.


스레드에 대한 지식이 부족하기 때문에 당장 이해를 100%하지못했고


스레드에 대한 이해도를 넓히고


참조글과 여러 공식문서들을 참조하면서


thread-safe한 코드를 작성할 수 있는 개발자가 되어야겠지요...? 화이팅... 갈길이 멀다


참조

https://howtodoinjava.com/java/basics/how-to-make-a-java-class-immutable/

https://javacan.tistory.com/entry/ThreadLocalUsage

https://sup2is.github.io/2021/05/03/thread-safe-in-java.html

https://blog.e-zest.com/java-monitor-pattern/

https://docs.oracle.com/javase/specs/jls/se8/html/jls-17.html#jls-17.1

https://bgpark.tistory.com/161

728x90
300x250
mag1c

mag1c

2년차 주니어 개발자.

스레드 안전 - Thread Safe

Tech/Java & Spring 2023. 5. 24. 21:19
728x90
728x90

연관 게시물


[Java] 자바에서의 스레드 안전(Thread Safe)과 모니터(monitor)

자바에서의 Thread-Safe 1. Lock synchronized 아래 코드는 Synchronized 키워드를 사용하여 스레드의 안전성을 보장했다. @ThreadSafe public class Lock { @GuardedBy("this") private int nextValue; public synchronized int getNext() { r

mag1c.tistory.com


Thread Safe

스레드 안전(thread safety)은 멀티 스레드 프로그래밍에서 일반적으로 어떤 함수나 변수, 혹은 객체가

여러 스레드로부터 동시에 접근이 이루어져도 프로그램의 실행에 문제가 없음을 뜻한다.

보다 엄밀하게는 하나의 함수가 한 스레드로부터 호출이 되어 실행중일 때, 다른 스레드가 그 함수를 호출하여 동시에 함께 실행되더라도 각 스레드에서의 함수 수행 결과가 올바로 나오는 것으로 정의한다.


출처 :https://gompangs.tistory.com/entry/OS-Thread-Safe%EB%9E%80


다음과 같은 구현 방법들이 있다.


재진입성(Re-entrancy)

어떤 함수가 한 스레드에 의해 호출되어 실행중일 때, 다른 스레드가 그 함수를 호출하더라도 그 결과가 각각에게 올바로 주어져야 한다.


상호 배제(Mutual exclusion)

공유자원을 꼭 사용해야 할 경우 해당 자원의 접근을 세마포어 등의 으로 통제한다.


스레드 지역 저장소(Thread-local storage)

공유 자원의 사용을 최대한 줄여 각각의 스레드에서만 접근 가능한 저장소들을 사용함으로써 동시 접근을 막는다.


원자 연산(Atomic operations)

공유 자원에서 접근할 때 원자 연산을 이용하거나, 원자적으로 정의된 접근 방법을 사용함으로써 상호 배제를 구현할 수 있다.


스레드부터 시작해서 CS 지식을 쌓아나갈 수 있길..


화이팅~


참조

https://ko.wikipedia.org/wiki/%EC%8A%A4%EB%A0%88%EB%93%9C_%EC%95%88%EC%A0%84


728x90
300x250
mag1c

mag1c

2년차 주니어 개발자.

[Java] 스태틱 블록(Static block) (초기화 블록)

Tech/Java & Spring 2023. 5. 24. 20:16
728x90
728x90

기존에 내가 사용하고 자주 봤던 static이 붙은 것들은

public static int a;

public static void main(String[] args){}


이정도인데, 업무 내에서 아래와 같은 코드를 발견했다.


public Conf {
    static {
        loadConfiguration();
    }
}


얼추 인스턴스가 생성될 때 아래의 메서드를 실행하는 것 정도만 알겠는데 정확히 어떤 것인지 모르겠다.


개념정리를 해놓고 언제든 활용할 수 있도록 해보자.


초기화 블록

class Class {
    static int Field = 10; // 클래스 변수의 명시적 초기화
    int Field2 = 20;     // 인스턴스 변수의 명시적 초기화
}


필드는 위와같은 형태로 초기화가 진행되는데, 초기화 블록을 활용하여 초기화를 할 수도 있다.


초기화 블록이란 클래스 필드의 초기화만을 담당하는 {}로 둘러싸인 블록이다.


초기화 블록은 생성자보다 먼저 호출되며, static 키워드의 유무에 따라 인스턴스 초기화블록, 클래스 초기화블록으로 구분할 수 있는데,


초기화 블록에는 다양한 명령문 및 제어문을 사용할 수 있으므로 복잡한 초기화를 해야 할 경우 유용하게 사용된다고 한다.


인스턴스 초기화 블록

인스턴스 초기화 블록은 생성자와 마찬가지로 인스턴스가 생성될 때마다 실행되는데,


생성자보다 먼저 실행된다.


여러 개의 생성자가 있을 때, 모든 생성자에서 공통으로 수행되어야 할 코드를 인스턴스 초기화 블록에 포함하여 사용하면, 코드의 중복을 막을 수 있다.


//코드 출처 : TCP School

class Car {

    private String modelName;
    private int modelYear;
    private String color;
    private int maxSpeed;
    private int currentSpeed; 

    {
        this.currentSpeed = 0;
    }


    Car() {}
    
    Car(String modelName, int modelYear, String color, int maxSpeed) {
        this.modelName = modelName;
        this.modelYear = modelYear;
        this.color = color;
        this.maxSpeed = maxSpeed;
    }


    public int getSpeed() {
        return currentSpeed;
    }

}


public class Member03 {

    public static void main(String[] args) {
        Car myCar = new Car();
        System.out.println(myCar.getSpeed());

    }

}


클래스 초기화 블록

인스턴스 초기화 블록에 static 키워드를 넣은 형태이며, 클래스가 메모리에 처음으로 로딩될 때 한 번만 실행된다.


클래스변수의 초기화를 수행할 때 사용된다

//코드 출처 : TCP School

class InitBlock {

    static int classVar;
    int instanceVar; 

    static {
        classVar = 10;
    }
}


public class Member04 {
    public static void main(String[] args) {
        System.out.println(InitBlock.classVar);
    }
}


초기화 순서

클래스 변수 : 기본값 > 명시적 초기화 > 클래스 초기화 블록

인스턴스 변수 : 기본값 > 명시적 초기화 > 인스턴스 초기화 블록 > 생성자


여러번 초기화 시 마지막으로 수행한 값만 남게된다.

//코드 출처 TCP School

class InitBlock {

    static int classVar = 10;
    int instanceVar = 10;

    static {
    	classVar = 20;
    }
    
    {
    	instanceVar = 20;
    }

    InitBlock() {
    	instanceVar = 30;
    }

} 

public class Member05 {
    public static void main(String[] args) {
        System.out.println(InitBlock.classVar);
        InitBlock myInit = new InitBlock();
        System.out.println(myInit.instanceVar);
    }
}

//20
//30


정리

public Conf {
    static {
        loadConfiguration();
    }
}


내가 봤던 위의 코드는, 해당 클래스가 처음으로 로딩될 때, loadConfiguration() 메서드를 실행한다.


해당 메서드를 통해 필드값을 정의하고 있기 때문에, 결국 클래스 변수를 초기화 하기 위해 사용했으며,


인스턴스 초기화블록은 인스턴스 생성 시마다 초기화를 진행하는데, 객체는 주로 생성자를 통해 초기화를 진행하기 때문에 잘 사용하지 않으며, 생성자가 엄청 많아서 코드가 과하게 겹칠 경우 사용하는 것이 좋다.


728x90
300x250
mag1c

mag1c

2년차 주니어 개발자.

Jsoup(1) - Jsoup이란? / 초간단 예시

Tech/Java & Spring 2023. 5. 11. 09:48
728x90
728x90
 

jsoup: Java HTML parser, built for HTML editing, cleaning, scraping, and XSS safety

jsoup: Java HTML Parser jsoup is a Java library for working with real-world HTML. It provides a very convenient API for fetching URLs and extracting and manipulating data, using the best of HTML5 DOM methods and CSS selectors. jsoup implements the WHATWG H

jsoup.org


Jsoup은 실제 HTML 작업을 위한 Java 라이브러리이다.

HTML5 DOM 메서드와 CSS selector을 사용하여 URL을 가져오고 데이터를 추출 및 조작하기 위한 매우 편리한 API를 제공한다.


1. URL, 파일 또는 문자열에서 HTML 스크랩 및 파싱

2. DOM 순회 또는 CSS select를 사용한 데이터 찾기 및 추출

3. HTML요소, 속성 및 텍스트 조작

4. XSS 공격을 방지하기 위해 수신 허용 목록에 대해 사용자 제출 콘텐츠 정리

5. 깔끔한 HTML 출력

을 제공해준다고 한다.


설치

아래의 링크에서 다운로드받아서 프로젝트 내부에 JAR을 추가하거나 Maven이나 Gradle에 주입하여 사용한다.  

나는 자바 프로젝트를 사용해서, JAR을 추가했다.


Download and install jsoup

Download and install jsoup jsoup is available as a downloadable .jar java library. The current release version is 1.16.1. What's new See the 1.16.1 release announcement for the latest changes, or the changelog for the full history. Previous releases of jso

jsoup.org


사용해보기

우선 공식 라이브러리 사이트에서 제공해주는Example 코드를 사용해보자.

package org.jsoup.examples;

import org.jsoup.Jsoup;
import org.jsoup.nodes.Document;
import org.jsoup.nodes.Element;
import org.jsoup.select.Elements;

import java.io.IOException;

public class jsoupexam {
    public static void main(String[] args) throws IOException {
        Document doc = Jsoup.connect("http://en.wikipedia.org/").get();
        log(doc.title());

        Elements newsHeadlines = doc.select("#mp-itn b a");
        for (Element headline : newsHeadlines) {
            log("%s\n\t%s", headline.attr("title"), headline.absUrl("href"));
        }
    }

    private static void log(String msg, String... vals) {
        System.out.println(String.format(msg, vals));
    }
}

위키디피아의 메인에서, 뉴스 섹션의 헤드라인 목록들을 가져온다고는 하는데

헤드라인인지는 모르겠으나 여튼 굵은 앵커태그의 title속성값과 href값을 가져오는데 성공했다.


728x90
300x250
mag1c

mag1c

2년차 주니어 개발자.

Servlet이란?

Tech/Java & Spring 2023. 4. 9. 06:40
728x90
728x90
 

WEB과 WAS의 차이, WEB이란? WAS란?

https://mag1c.tistory.com/299 https://mag1c.tistory.com/300 작은 프로젝트를 두번, 개인 프로젝트를 한번 진행하면서 모두 Apache-Tomcat 서버를 사용하였다. 기존에 알고 있는 바로는 다음과 같다. 1. Apache : WEB Ser

mag1c.tistory.com


JSP란? (Java Server Pages)

https://mag1c.tistory.com/298 https://mag1c.tistory.com/300 JSP (Java Server Pages) JSP(Java Server Pages) HTML내에 자바 코드를 삽입하여 웹 서버에서 동적으로 웹 페이지를 생성하여 웹 브라우저에 돌려주는 서버 사이

mag1c.tistory.com


Servlet


자바 서블릿

자바를 사용하여 웹 페이지를 동적으로 생성하는 서버측 프로그램 혹은 그 사양을 말하며, 흔히 서블릿이라 불린다.

서블릿은 자바 코드안에 HTML을 포함하고 있다.


서블릿은 웹에 다양한 기능이 요구되면서 정적인 자료 뿐 아니라 동적인 페이지들을 만들 필요가 생겼기 때문에 만들어졌다. 서블릿은 클라이언트의 요청에 맞춰 동적인 결과를 만들어 주는 자바 웹 프로그래밍 기술이며, 서블릿은 WAS의 서블릿 컨테이너 안에서 동작하게 된다.


특징

1. 클라이언트의 요청에 동적으로 응답하는 웹 어플리케이션 요소(Component)

2. HTML을 사용하여 응답

3. JAVA의 Thread 이용

4. MVC 패턴의 Controller 역할을 함

5. HTTP 프로토콜 서비스를 지원하는 javax.servlet.http.HttpServlet클래스를 상속받는다

6. UDP보다 처리 속도가 느림

7. HTML변경 시 서블릿을 재컴파일해야 한다.


서블릿(웹) 컨테이너


웹 컨테이너(서블릿 컨테이너)와 동작과정


서블릿 컨테이너는 서블릿을 담고 관리해주는 컨테이너다. 서블릿 클래스의 규칙에 맞게 서블릿을 관리하며, 클라이언트의 요청을 받으면 HttpServletRequest와 HttpServletResponse 객체를 생성하여 post, get에 따라 동적인 페이지를 생성하여 응답한다.


1. 서블릿 생명주기 관리

서블릿의 생명주기를 관리한다. 서블릿 클래스를 로딩하여 인스턴스화하고 초기화 메서드를 호출하고, 요청이 들어오면 적절한 서블릿 메서드를 찾아서 동작한다. 또한 서블릿의 생명이 다하면 가비지 컬렉션을 통해 메모리에서 제거한다.


2. 통신 지원

웹 서버와 소켓을 만들어서 클라이언트의 요청을 받고 응답할 수 있는 통신을 지원해 준다. 통신을 하기 위한 listen, accept등의 과정을 API로 제공하여 복잡한 과정을 생략해주기 때문에 개발자가 비즈니스 로직 개발에 집중할 수 있게 도와준다.


3. 멀티쓰레드 지원 및 관리

클라이언트의 요청을 받을 때마다 새로운 자바 스레드를 생성한다. 그래서 동시에 여러 요청이 들어와도 멀티쓰레딩 환경에서 동시다발적 작업을 관리할 수 있다.


4. 보안 관리

보안 관련 기능을 제공하기 때문에 개발자는 서블릿에 보안 관련 메서드를 구현하지 않아도 된다.


서블릿의 동작 과정

1. 클라이언트의 요청
2. HttpServletRequest, HttpServletResponse 객체 생성
3. Web.xml이 어느 서블릿에 대해 요청한 것인지 탐색
4. 해당하는 서블릿에서 service()메서드 호출
5. doGet()또는 doPost()호출
6. 동적 페이지 생성 후 ServletResponse 객체에 응답 전송
7. HttpServletRequest, HttpServletResponse 소멸


서블릿의 생명 주기


서블릿 생명주기 메서드

init() / 초기화
서블릿 요청 시 맨 처음 한번만 호출됨

doGet(), doPost() / 작업 메서드
서블릿 요청 시 매번 호출되며, 클라이언트가 요청한 것에 맞춰 실행됨

destroy() / 종료
메모리에서 소멸될 때 호출된다.


1. 서블릿 객체 생성

최초 호출 시 Tomcat(WAS)에서 서블릿 파일을 불러와 컴파일한 후 메모리에 로드한다.

Tomcat은 서블릿 파일이 변경되는게 아니라면 서버 종료 전까지 해당 객체를 계속 재활용한다.

JSP파일이나 서블릿파일이 수정된다면 서블릿 자원을 해제시킨 뒤 새로운 객체를 생성해서 메모리에 로드하는 형식이다.


2. 선처리 작업 수행(객체 생성 시 최초 1회 수행)

서블릿에서 메서드를 임의로 작성하고 @PostConstruct 어노테이션을 부여하여 가장 먼저 해당 메서드를 실행한다.

서블릿 객체가 생성될 때 먼저 처리하고 싶은 로직이 있다면 만들어준다.

init()메서드로 수행해도 큰 문제는 없으나, 성격이 다른 로직이라면 별도로 분리해서 작성 가능하다.

@PostConstruct

의존성 주입이 이루어진 후 초기화를 수행하며, service 로직을 수행하기 전에 발생한다.


3. init() 실행

GenericServlet 클래스에서 정의하는 메서드

서블릿 객체 생성 시 초기화 작업을 수행하는 역할

Tomcat 서버 환경설정 파일인 web.xml의 내용을 불러와 ServletConfig 객체로 생성해준다.

오버로딩 구조로 되어있고 Tomcat에서 ServletConfig객체를 파라미터로 넣어 실행하며, init()메서드를 오버라이딩하지 않으면 아무것도 실행시키지 않는다.


4. Service() : 자원 해제 전까지 요청이 올때마다 반복 실행

클라이언트에서 요청이 오면, 요청에 맞춰 GET, POST등이 실행된다.


5. destroy() : 소멸

컨테이너가 서블릿에 종료 요청 시 실행되며, 종료시에 처리해야할 작업들은 destroy() 메서드를 오버라이딩하여 구현한다.


서블릿 작성 예시


위의 그림처럼, 프로젝트 선택 후 New - Servlet을 선택하여 생성하고, 패키지명, 클래스명과 URL 매핑, 메서드를 선택하여 만들면 되는데, 자세한 사항은 해당 블로그를 참조하자. (링크)


package com.java.example;

import java.io.IOException;
import java.io.PrintWriter;

import javax.servlet.ServletException;
import javax.servlet.annotation.WebServlet;
import javax.servlet.http.HttpServlet;
import javax.servlet.http.HttpServletRequest;
import javax.servlet.http.HttpServletResponse;

/**
 * Servlet implementation class gunchim
 */
@WebServlet("/gunchim")
public class gunchim extends HttpServlet {
	private static final long serialVersionUID = 1L;
       
    /**
     * @see HttpServlet#HttpServlet()
     */
    public gunchim() {
        super();
        // TODO Auto-generated constructor stub
    }

	/**
	 * @see HttpServlet#doGet(HttpServletRequest request, HttpServletResponse response)
	 */
	protected void doGet(HttpServletRequest request, HttpServletResponse response) throws ServletException, IOException {
		// TODO Auto-generated method stub
		response.setContentType("text/html;charset=euc-kr");
        PrintWriter out=response.getWriter();
        out.println("<html>"+"<body>"+"<h1>서블릿이다 </h1> "+"</body>"+"</html>");
	}

	/**
	 * @see HttpServlet#doPost(HttpServletRequest request, HttpServletResponse response)
	 */
	protected void doPost(HttpServletRequest request, HttpServletResponse response) throws ServletException, IOException {
		// TODO Auto-generated method stub
		doGet(request, response);
	}

}


/main으로 요청 시 com.java.example.gumchim라는 서블릿으로 연결해서 보여줄 수 있도록 web.xml의 하단에 설정 코드를 추가해준다.

<?xml version="1.0" encoding="UTF-8"?>
<web-app xmlns:xsi="http://www.w3.org/2001/XMLSchema-instance" xmlns="http://xmlns.jcp.org/xml/ns/javaee" xsi:schemaLocation="http://xmlns.jcp.org/xml/ns/javaee http://xmlns.jcp.org/xml/ns/javaee/web-app_4_0.xsd" id="WebApp_ID" version="4.0">
  <display-name>Servlet</display-name>
  <welcome-file-list>
    <welcome-file>index.html</welcome-file>
    <welcome-file>index.htm</welcome-file>
    <welcome-file>index.jsp</welcome-file>
    <welcome-file>default.html</welcome-file>
    <welcome-file>default.htm</welcome-file>
    <welcome-file>default.jsp</welcome-file>
  </welcome-file-list>
     <servlet>
      <servlet-name>Name</servlet-name>
      <servlet-class>com.java.example.gunchim</servlet-class>
   </servlet>
   
   <servlet-mapping>
      <servlet-name>Name</servlet-name>
      <url-pattern>/class</url-pattern>
   </servlet-mapping>
    
    
   <servlet>
      <servlet-name>ServletTest</servlet-name>
      <servlet-class>com.java.example.gunchim</servlet-class>
   </servlet>
   
   <servlet-mapping>
      <servlet-name>ServletTest</servlet-name>
      <url-pattern>/main</url-pattern>
   </servlet-mapping>
</web-app>


참조

https://ko.wikipedia.org/wiki/%EC%9E%90%EB%B0%94_%EC%84%9C%EB%B8%94%EB%A6%BF

https://code-lab1.tistory.com/210

https://velog.io/@falling_star3/Tomcat-%EC%84%9C%EB%B8%94%EB%A6%BFServlet%EC%9D%B4%EB%9E%80


728x90
300x250
mag1c

mag1c

2년차 주니어 개발자.

방명록